Below is a list of the basic cable connections that are available in classrooms on campus.
Current Cables and Connections
Below is a list of cables that are currently being used on campus and are being installed in renovated classrooms.
HDMI Cable
The is the most widespread cable on campus in classrooms. It carries both AUDIO and VIDEO to the room av equipment. All Dell Laptops have an HDMI port located on the side. MAC laptops do not have an HDMI port and will need a USBC to HDMI adapter that plugs into one of the USBC ports on the MAC laptop. These Dongles can be picked up at the IT Service Desk.
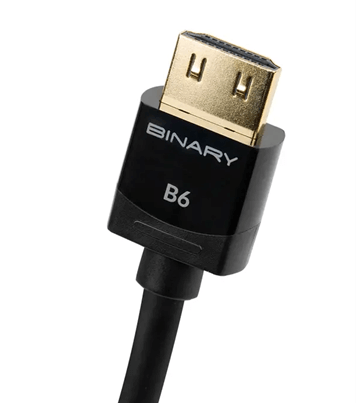
HDMI Cable (Audio & Video)
USBC Dongle For MAC Laptops
USBC Power Cable
The USBC cable on the instructor cart is for POWER ONLY. This cable will provide power to both MACs and Windows laptops with a USBC connection. If using your laptop for a lecture, the cable will not charge your laptop battery, but will only keep it on
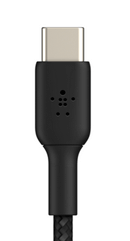
USBC POWER cable for laptop power in classrooms
Network Cable
The network cable (ethernet cable) will provide internet connection for your laptop in the classroom without having to connect to wifi. This is a great way for guest speakers to receive internet access in an EKU Classroom. All Dell Windows laptops will have a network port on the right side of the laptop. MACS will need a USBC to Ethernet cable adapter that plugs into one of the open USBC ports on the MAC.
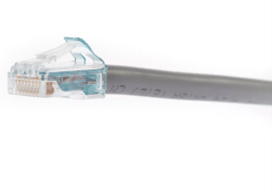
Network Cable for Internet Access
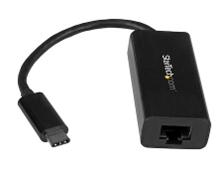
USBC Ethernet Cable Adapter (MACS)
Older Cables & Connections
Below is a list of cables that are being phased out on campus but are still used in some classrooms on campus.
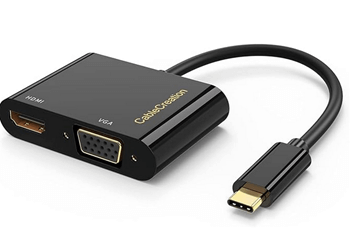
VGA Cable
VGA Cable is an older cable type on campus that supports analog video. This cable is VIDEO only and will not carry laptop audio to the room speakers. If you are in a room that is VGA only you will need an HDMI to VGA Adapter or USBC to VGA Adapter to use video in the AV system in the room.
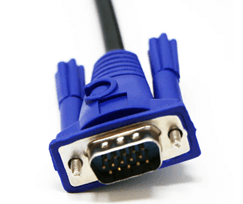
VGA CABLE
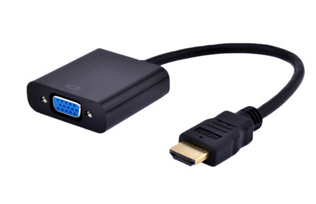
HDMI to VGA Adapter
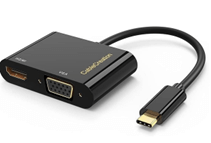
USBC to VGA Adapter
3.5m Audio Cable
3.5m audio cables are typically in rooms that have VGA connections. You will need to plugin this cable to the headphone jack on your laptop to have your laptop audio play on the classroom speakers.
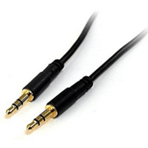
3.5m Audio Cable
Updated classrooms on campus have a control panel located on or next to the instructor station. Below is a list of buttons and features that the control panel controls in classrooms.
Push Button Control Panel Layout
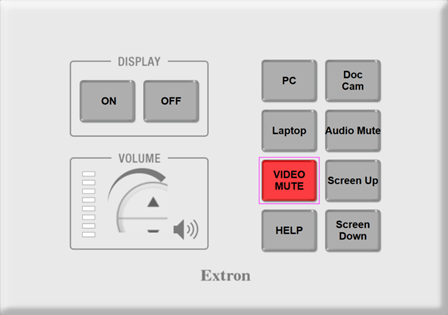
Below is a picture of what the classroom control panel looks like that controls all of the AV equipment. The HELP Button is highlighted red. The other buttons perform various other functions in the classroom.
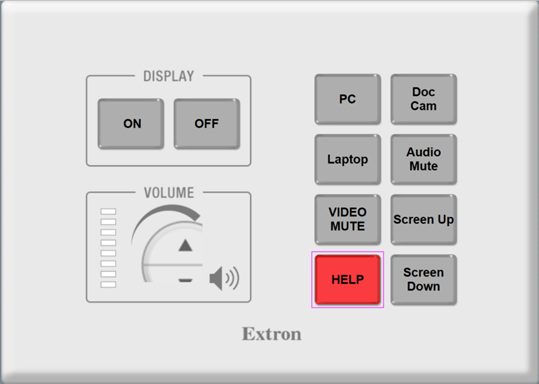
Buttons on a Push Button Control Panel
On/Off
Will turn on or off all classroom AV equipment including projectors, audio, and electric screens. When the on or off button is blinking red that means the equipment is warming up, and may not function correctly until all equipment is ready. When the button stops flashing all room AV equipment is ready to use.
NOTE: Some classrooms still use Bulbed projectors, and may need 30 seconds to 1 minute to warm up. PLease do not attempt to use AV equipment until the ON button has stopped flashing, as the projector may not display an image until it is done warming up.
Volume
All push button control panels come with a volume knob. Turn the knob to the right to increase audio volume, and turn the knob to the left to decrease audio volume. The LED indicators to the left of the volume knob will show current room volume level.
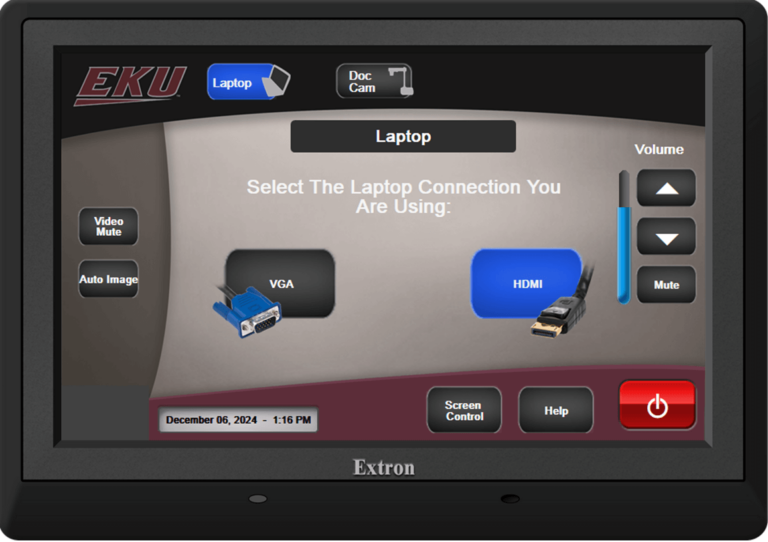
Input Buttons Laptop, DocCam, and PC
The Push Button control panel will have a few input options to have displayed on the classroom display. Press Laptop to have the room set to your laptop, select DocCam to have the Document Camera display, and select PC to have a local room desktop computer at the instructor station display.
NOTE: You may need to adjust your mirror or display settings on your laptop to have it display in the classroom.
Audio Mute or Video Mute
To mute room audio press the audio mute button once. It will turn red indicating that the audio mute is active. Press again to turn the audio mute off and room audio will be restored. The button will go from red to dim.
To mute or blank video in the classroom press the video mute or Blank button once. It will turn red indicating that the video mute is active. Press the video mute or blank button one more time to disable, the button will go from red to dim.
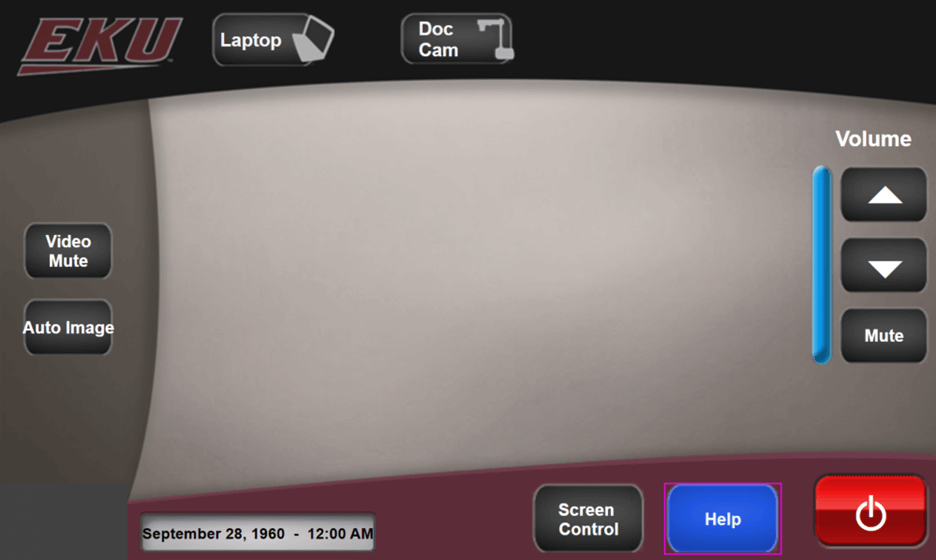
Help Button
Press the HELP button one time. The help button will start to blink red. Once the help button is blinking red this confirms that an email and Microsoft Teams message has been sent to the IT Department. An AV technician will now visit the room as soon as possible to assist with your AV issue.
If you no longer need help in the classroom, press the HELP button one more time. The button will go dark and stop blinking red. This means an email and Microsoft Teams message has been sent to the IT department and the AV technician will no longer visit the classroom.
TouchScreen Control Panel Layout
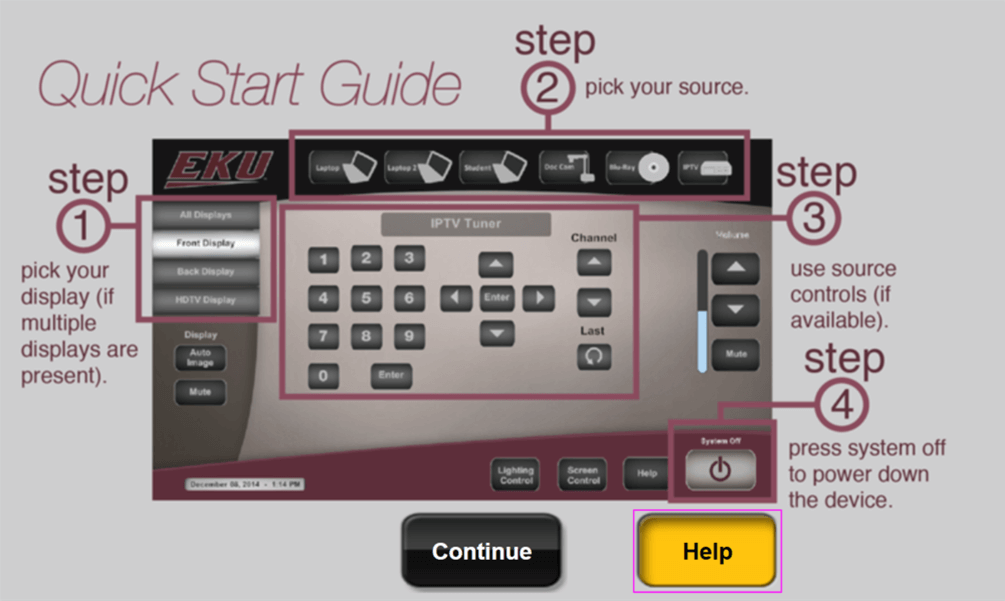
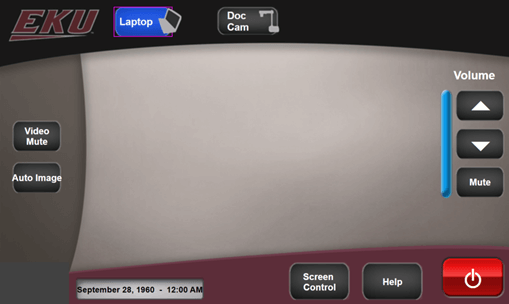
To Start Using a Touchscreen Controller
The Touchscreen controller will have a main page with the EKU Logo in the middle. Press the “System On” button on the bottom right to start the room AV system. The system will power on and will bring you to the main layout page pictured above.
Input Buttons
The input buttons will be at the top of the main page. Most classrooms will have LAPTOP, DOC COM, PC, or DVD Player as input options.
Audio Buttons
Audio controls are on the middle right side of the touchscreen controller.
Screen Control
Screen controls are on the bottom middle side of the touchscreen controller. Press the Screen Control Button once to bring up the Screen Control menu page.

Help Button
The Help Button is located on the bottom right corner of the screen. Press the Help Button once to bring up the Help Menu.

Below is a step-by-step guide to connect to an AirTame for wireless video presenting in classrooms and conference rooms.
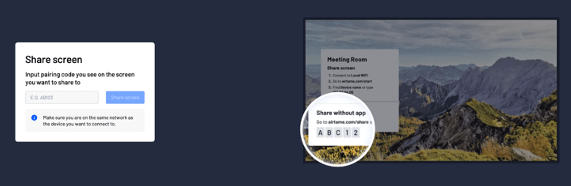
Connect to Airtame With a Web Browser
Share from Browser is a feature that allows a user to wirelessly share their screen directly from a web browser without having to install the Airtame application on their computer. Browsers currently supported are Google Chrome, Microsoft Edge, Safari, and Firefox.
Please Note – Share from Web Browser does not work with Mobile devices such as android phones or apple tablets and phones.
To Start a Connection
On the display screen you will notice that the default home screen now includes instructions to share from the browser and a 5-character passcode.
Connect to Airtame With the AirTame App
Streaming your computer screen works the same on Windows, macOS, and Linux. Simply follow the on-screen instructions:
Download the App
Share Screen Instructions
By clicking on the button Share screen you will be able to mirror your whole screen to the Airtame-equipped screen or projector. Once you minimize the app, the control bar will show up, where it will allow you to choose between Share Window and Share Screen, stream with or without sound, and stop streaming.
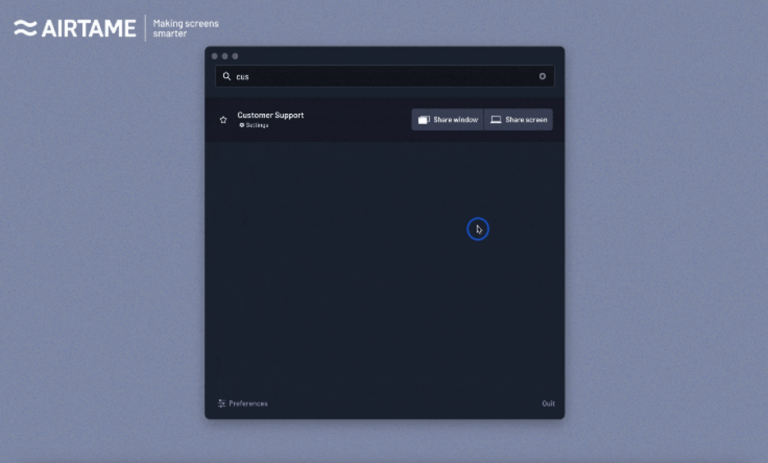
Click the Share Screen button to Share the Entire Laptop Screen.
Share Window Instructions
You can select the specific window you want to stream by pressing the Share Window button. The window will turn blue for a second when selected. Once the window is selected the app will minimize and you will be able to control your stream without taking up any space on your desktop. The control bar allows you to choose between Share Window and Share Screen, stream with or without sound, and stop streaming.
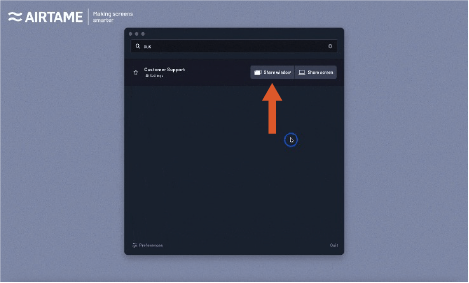
Click the Share WINDOW button to Share a specific screen, browser, or tab to the Airtame.
Streaming with Audio
To stream with audio, click on the speaker icon to add sound. This will enable audio and increase the stream quality while adding a 1-second buffer to ensure fluent playback.
Streaming Notification
When streaming, a window like the one below will show on your screen to remind you that you are streaming, and lets you control the ongoing stream:

Share the Same Content to Multiple Screens at the Same Time
With the Airtame app, you are able to stream to multiple screens simultaneously. You can do that by starting a stream to one screen and then using the button + Add screen. By choosing from the Airtame app list or typing their name or IP address in the search bar, you can find the screens you want to stream to.
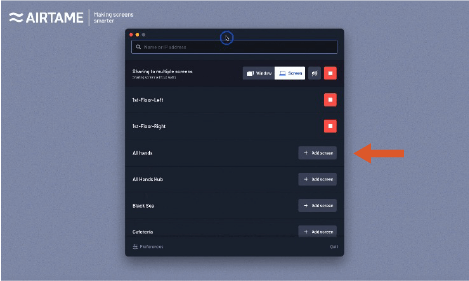
Once you minimize the app, the control bar will show up, where it will allow you to choose between Share Window and Share Screen, stream with or without sound, and stop streaming.
Please note that if you stop the streaming from the control bar, the streaming to all of the screens will be stopped.
Updated classrooms on campus have an AV HELP button located on the control panel. If you are having audio problems, video issues, or other technical issues with the classroom av system you can press the HELP button to request assistance. Someone from the EKU AV team will visit the classroom as soon as possible to assist with your technical issue.
Control Panel Layout
Below is a picture of what the classroom control panel looks like that controls all of the AV equipment. The HELP Button is highlighted red. The other buttons perform various other functions in the classroom.
How to Use the Help Button on a Control Panel
To Request Help and have an AV Tech Visit the Classroom
Press the HELP button one time. The help button will start to blink red. Once the help button is blinking red this confirms that an email and Microsoft Teams message has been sent to the IT Department. An AV technician will now visit the room as soon as possible to assist with your AV issue.
To Cancel Help if you no longer have a technical issue
If you no longer need help in the classroom, press the HELP button one more time. The button will go dark and stop blinking red. This means an email and Microsoft Teams message has been sent to the IT department and the AV technician will no longer visit the classroom.
How to Use the Help Button on a Touch Screen Panel
The HELP button on a touch screen control panel will be on the bottom right of the screen after the system has been turned on. It is highlighted in blue below. Press the HELP button once and the quick start guide page will open.
The quick start guide goes over the basic functions of the buttons on the Touchscreen Control Panel. Here you can learn how to control multiple displays, change input sources (Laptop, doc cam, DVD player, etc) or adjust volume level for audio. IF YOU NEED MORE HELP PRESS THE HELP BUTTON AGAIN ON THIS PAGE. IT IS HIGHLIGHTED IN YELLOW. This will open up another page, see below. Hit the SEND EMAIL button to request for help. If you no longer need help, press the continue button.
If you need immediate help, call the service desk at 859-622-300 OR if you would like to have an AV Technician visit the classroom to assist. Press the SEND EMAIL button on the bottom left. It is highlighted in Yellow. This will send an email to EKU IT and a Microsoft Teams notification to an AV Technician. If you no longer need Help press the red close button on the bottom right.
If an AV Technician does not visit the classroom
If an AV technician does not visit the classroom after you pressed the HELP button they may be assisting other instructors or working on another issue in a different classroom. If that happens and you need technical assistance please do the following
If trying to use classroom AV equipment with a university provided laptop and you are not getting audio out of the room speakers, please try the following steps to resolve.
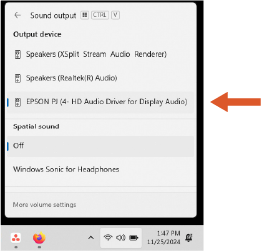
Select Speaker Output on Windows
If using a windows machine and you are not getting audio to the classroom speakers, please try the following steps.
Select Speaker Output on Windows

MAC Laptop or IMAC Desktop
If using a MAC machine and you are not getting audio to the classroom speakers, please try the following steps.
Select Sound Output on MAC

The following steps and troubleshooting measures can help solve some basic video issues in classrooms.
Windows Laptop or Desktop
If using a windows machine and you are not getting video to the classroom displays please try the following steps.
Windows P
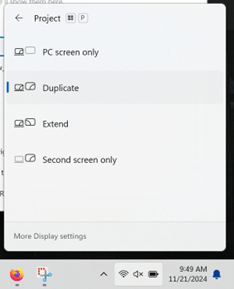
Control Panel Input
If you tried windows p and made sure the HDMI cable is plugged in and there still isn’t an image on the classroom display try the following steps with the room Control Panel. This will also work with MAC computers having similar issues.
MAC Laptop or IMAC Desktop
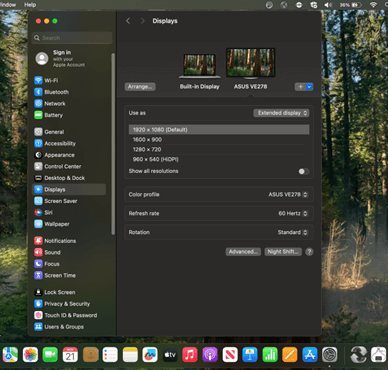
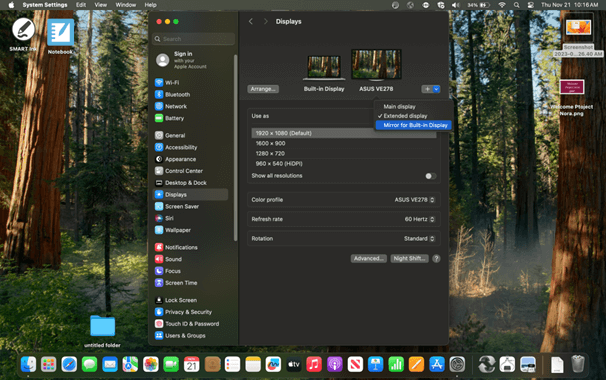
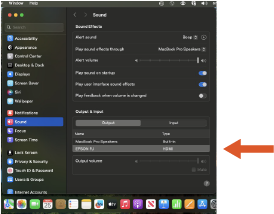
Mirror Settings
On a Mac type “Displays” in the search bar and select “Displays”. Select the Display you want to connect to, (Epson Projector, LG TV, etc) To the right of “Use As” click the arrows then select “Mirror for Built-in Display” This will mirror the MAC Laptop screen to all classroom displays.